


|
|
|
|
||
|
|||||||||||||||||||||||||||||||||||||||||||||||||||||||||||||||||||||||||||||||||||||||||||||||||||||||||||||||||||||||||||||||||||||||||||||||||||||||||||||||||||||||||||
| School Postcode: NG34 7RS | DCFS number: | ||||||||||||||||||||||||||||||||||||||||||||||||||||||||||||||||||||||||||||||||||||||||||||||||||||||||||||||||||||||||||||||||||||||||||||||||||||||||||||||||||||||||||
| Staff member who developed this case study: | Gareth Richards | ||||||||||||||||||||||||||||||||||||||||||||||||||||||||||||||||||||||||||||||||||||||||||||||||||||||||||||||||||||||||||||||||||||||||||||||||||||||||||||||||||||||||||
| Email contact: | gareth.richards@kshs.lincs.sch.uk | ||||||||||||||||||||||||||||||||||||||||||||||||||||||||||||||||||||||||||||||||||||||||||||||||||||||||||||||||||||||||||||||||||||||||||||||||||||||||||||||||||||||||||
| School telephone: 01529 414044 | No. on roll: approx 860 | ||||||||||||||||||||||||||||||||||||||||||||||||||||||||||||||||||||||||||||||||||||||||||||||||||||||||||||||||||||||||||||||||||||||||||||||||||||||||||||||||||||||||||
| Brief pen picture of school: | Kesteven and Sleaford High School is a selective girls’ school. Situated in the market town of Sleaford, it predominantly serves a rural area. There are approximately 860 students, 640 in the main school and 220 in the sixth form. The sixth form being collaborated with two other secondary schools in the town. The school has been a Visual Arts College since 2003 and a Training School since April 2008. Two out of the four leading subjects for Visual arts are Technology based – Graphics and Textiles, the other two being ICT and Art. The Technology Department consists of 3 full time and 3 part time teachers as well as 1 full time and 1 part time technicians. The subject offered are resistant Materials, Graphic Products, Food and Textiles. At the beginning of Key stage 3 students undertake a transition project of 3 weeks introducing them to the design process and then follow a carousel of RM/Graphics, Food and Textiles during years 7 and 8. In year 9 they chose to follow 2 subjects, enabling them to gain a deeper appreciation of the subjects. The subjects are popular choices for GCSE but are limited to one group per subject area due to room and timetable restrictions. GCSEs / A levels offered are RM, Graphic Products, Food and Textiles. There is one specialist room for Resistant Materials, Food and Textiles, with Graphics being taught in an open plan area shared with 15 computers. |
||||||||||||||||||||||||||||||||||||||||||||||||||||||||||||||||||||||||||||||||||||||||||||||||||||||||||||||||||||||||||||||||||||||||||||||||||||||||||||||||||||||||||
1. The Teacher CPD Course: |
|||||||||||||||||||||||||||||||||||||||||||||||||||||||||||||||||||||||||||||||||||||||||||||||||||||||||||||||||||||||||||||||||||||||||||||||||||||||||||||||||||||||||||
| The Project Brief: Design and Manufacture a MPS amplifier and docking station. The casing will be aimed at a particular design era. The casing needs to be versatile enough to be adopted to be used for a school Year 9 project. |
|||||||||||||||||||||||||||||||||||||||||||||||||||||||||||||||||||||||||||||||||||||||||||||||||||||||||||||||||||||||||||||||||||||||||||||||||||||||||||||||||||||||||||
Specification:
To include
|
|||||||||||||||||||||||||||||||||||||||||||||||||||||||||||||||||||||||||||||||||||||||||||||||||||||||||||||||||||||||||||||||||||||||||||||||||||||||||||||||||||||||||||
| Concept Sketches:
All ideas could easily be adapted to be used as a focus for a class project. Ideas 1 and 3 could be limited in terms of shape changing and skills used. Idea 2 has potential as the base, casing and front could all easily be changed and joined differently. Idea 1 I feel many students would use their past experiences and make a wooden frame (something they already have done in Year 7) I do like though like the simplicity of idea 3. Therefore I will develop the concept shown in idea 2 but will try and include some of the features from 3.
The box shape can easily be modified to ensure students of all abilities can have a final model. Ie it can be made from simple butt joints in softwood / plywood or could have a rounded appearance from being machined on 3D router. |
|||||||||||||||||||||||||||||||||||||||||||||||||||||||||||||||||||||||||||||||||||||||||||||||||||||||||||||||||||||||||||||||||||||||||||||||||||||||||||||||||||||||||||
| 1. Electronic circuit development: | |||||||||||||||||||||||||||||||||||||||||||||||||||||||||||||||||||||||||||||||||||||||||||||||||||||||||||||||||||||||||||||||||||||||||||||||||||||||||||||||||||||||||||
a) Circuit diagrams/schematics |
|||||||||||||||||||||||||||||||||||||||||||||||||||||||||||||||||||||||||||||||||||||||||||||||||||||||||||||||||||||||||||||||||||||||||||||||||||||||||||||||||||||||||||
b) PCB artwork  |
|||||||||||||||||||||||||||||||||||||||||||||||||||||||||||||||||||||||||||||||||||||||||||||||||||||||||||||||||||||||||||||||||||||||||||||||||||||||||||||||||||||||||||
c) Program details |
|||||||||||||||||||||||||||||||||||||||||||||||||||||||||||||||||||||||||||||||||||||||||||||||||||||||||||||||||||||||||||||||||||||||||||||||||||||||||||||||||||||||||||
| The Final Circuit Board: | |||||||||||||||||||||||||||||||||||||||||||||||||||||||||||||||||||||||||||||||||||||||||||||||||||||||||||||||||||||||||||||||||||||||||||||||||||||||||||||||||||||||||||
| Commentary: The final layout and design was fairly constricted by the components I was going to use and therefore the circuit design was straightforward. Adding the school initials and a title to the board was a nice surprise / touch and added a dimension to the ‘design’ of the board, which I am sure students would love. Thanks must go to Les Porter here for his invaluable help with the board. I would like to explore this software / stage in more detail given time but due to time constraints will move on to construction asap! | |||||||||||||||||||||||||||||||||||||||||||||||||||||||||||||||||||||||||||||||||||||||||||||||||||||||||||||||||||||||||||||||||||||||||||||||||||||||||||||||||||||||||||
2. CAD/CAM Development:
By modelling my basic final idea in prodesktop I was then able to explore possible changes to the shape without changing the concept. Once complete I then could sketch over the possible detail easily. This technique I will certainly be trying with students and also using the colour rendering on prodesktop to add texture / shading etc.
The jack lead originally was to be on the top of the unit. I changed its position to the back as it looked too tempting to pick the unit up by the lead! |
|||||||||||||||||||||||||||||||||||||||||||||||||||||||||||||||||||||||||||||||||||||||||||||||||||||||||||||||||||||||||||||||||||||||||||||||||||||||||||||||||||||||||||
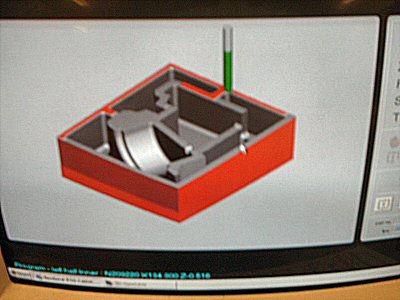
| Final CAD Design: | |||||||||||||||||||||||||||||||||||||||||||||||||||||||||||||||||||||||||||||||||||||||||||||||||||||||||||||||||||||||||||||||||||||||||||||||||||||||||||||||||||||||||||
CAM Manufacture:
|
|||||||||||||||||||||||||||||||||||||||||||||||||||||||||||||||||||||||||||||||||||||||||||||||||||||||||||||||||||||||||||||||||||||||||||||||||||||||||||||||||||||||||||
Commentary:
I was to manufacture each half of the unit both internally and externally but for two reasons I only did the internal cuts to ensure I could finish the product at a later date.
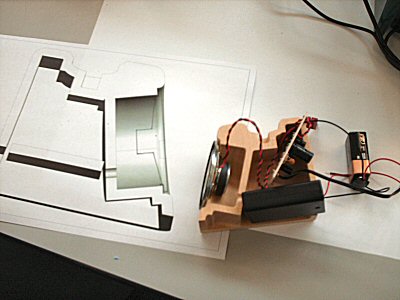
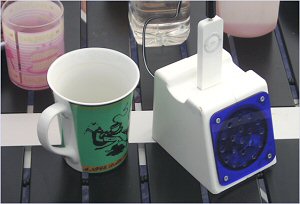
I resisted gluing the halves together just in case I need to make modifications to the circuit or need to get the circuit out or demonstrate to students the possibilities that can be achieved using the router. The final outcome is very pleasing considering the rushed nature of the construction process. The finish was simply 2 coats of spray paint, which just goes to show the importance of obtaining a good quality wood in the first place, in this case jelutong. Picture taken while on camping trip and shows proportion with coffee mug.
Field test proved a great success with family and batteries lasted a lot longer than anticipated.
Mark on the front corner is mud from when it was dropped by my daughter who wanted to play with it! |
|||||||||||||||||||||||||||||||||||||||||||||||||||||||||||||||||||||||||||||||||||||||||||||||||||||||||||||||||||||||||||||||||||||||||||||||||||||||||||||||||||||||||||
2. The Student Scheme of Work |
|||||||||||||||||||||||||||||||||||||||||||||||||||||||||||||||||||||||||||||||||||||||||||||||||||||||||||||||||||||||||||||||||||||||||||||||||||||||||||||||||||||||||||
| Aimed at Key Stage: 3 (Year 9 in particular) | |||||||||||||||||||||||||||||||||||||||||||||||||||||||||||||||||||||||||||||||||||||||||||||||||||||||||||||||||||||||||||||||||||||||||||||||||||||||||||||||||||||||||||
| Estimated time available for project: 22 periods of 50 minutes | |||||||||||||||||||||||||||||||||||||||||||||||||||||||||||||||||||||||||||||||||||||||||||||||||||||||||||||||||||||||||||||||||||||||||||||||||||||||||||||||||||||||||||
| National Curriculum PoS covered by Scheme of work: | |||||||||||||||||||||||||||||||||||||||||||||||||||||||||||||||||||||||||||||||||||||||||||||||||||||||||||||||||||||||||||||||||||||||||||||||||||||||||||||||||||||||||||
| The Scheme of Work: Year 9 Scheme of Work: Resistant Materials Project 1: Electronics / Systems and Control – Personal Amplifier
|
|||||||||||||||||||||||||||||||||||||||||||||||||||||||||||||||||||||||||||||||||||||||||||||||||||||||||||||||||||||||||||||||||||||||||||||||||||||||||||||||||||||||||||
List the design decisions you will be asking pupils to make. Conceptual design decisions Research / analysis skills
Designing / sketching skills
Technical design decisions
The model is then photographed and detail is drawn onto the photo. Consideration at this stage is mainly about fitting the components and drawing up a cutting list for production. Aesthetic Their final idea ideally needs to be presented through 3D drawing techniques before planning and making can begin to ensure they are happy with their final design. Any lingering issues can be solved at this stage. Constructional decisions
The modifications will be recorded in development sketches and notes. Planning
Outcomes will be
Market considerations
|
|||||||||||||||||||||||||||||||||||||||||||||||||||||||||||||||||||||||||||||||||||||||||||||||||||||||||||||||||||||||||||||||||||||||||||||||||||||||||||||||||||||||||||
| Individual Lesson Plans: | |||||||||||||||||||||||||||||||||||||||||||||||||||||||||||||||||||||||||||||||||||||||||||||||||||||||||||||||||||||||||||||||||||||||||||||||||||||||||||||||||||||||||||
Student Outcomes:
Year 9 initial ideas for Amplifier Project - Group 2
|
|||||||||||||||||||||||||||||||||||||||||||||||||||||||||||||||||||||||||||||||||||||||||||||||||||||||||||||||||||||||||||||||||||||||||||||||||||||||||||||||||||||||||||
Commentary: Overall I found the project to of really enhanced my teaching in a number of ways.
Students in year 9 now spend half a year in two technology related areas instead of quarter a year rotating between four areas. This increase in time has allowed time for students to concentrate on developing challenging and exciting outcomes. I feel this project meets and exceeds all our success criteria. |
|||||||||||||||||||||||||||||||||||||||||||||||||||||||||||||||||||||||||||||||||||||||||||||||||||||||||||||||||||||||||||||||||||||||||||||||||||||||||||||||||||||||||||
![]()
Site developed by Amethyst Consultancy 2008
 Kesteven and Sleaford High School


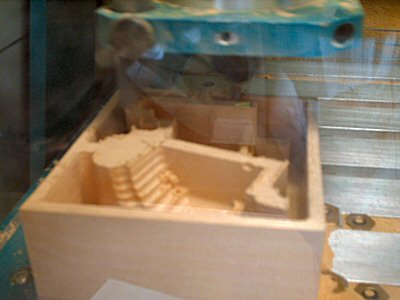
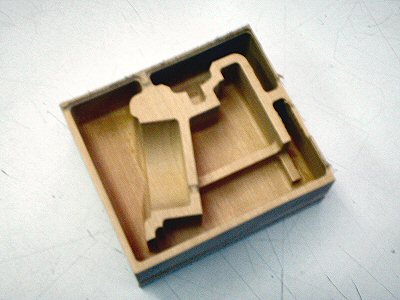
 Once both internal halves were machined out, I then completed the shaping of the exterior using the bandsaw and files.
From an aesthetic point of view it would of been nice to of done all the machining using the router but it was far quicker using hand tools once the main shape was complete.
The two halves are simply held together by the screws from the front acrylic speaker plate at the front and screws holding the battery holder in place underneath.
Once both internal halves were machined out, I then completed the shaping of the exterior using the bandsaw and files.
From an aesthetic point of view it would of been nice to of done all the machining using the router but it was far quicker using hand tools once the main shape was complete.
The two halves are simply held together by the screws from the front acrylic speaker plate at the front and screws holding the battery holder in place underneath.